I don’t know about you, but I think photo props are such a fun idea! They turn mild-mannered, maybe even photo shy or at least photo averse, people into hams for the camera! That is pure magic in my book, especially since I’ve got a couple of those photo averse younger people living in my house!
So, when I was thinking about the latest challenge at The Creative Cutting Challenge (Halloween – Not a Card), I thought the photo props would be a great way to get my kids to “dress up” and ham it up for the camera and I was right, hurrah!
I did give them choices as to which props they wanted and how they wanted them to look (and I created a couple without their input that I thought I might use but then I was able to recruit a drama-queen thespian willing to pose, even better!)
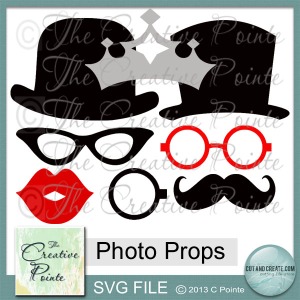
Here’s all the props you get in the Photo Props collection from The Creative Pointe:
Here’s how mine turned out:
I used: cardstock from: Bazzill, Colorbok, DCWV, Doodlebug, The Paper Studio; Gems from: Bead Landing; Ranger Liquid Pearls and Crackle Accents; Adhesive from: Scotch and Xyron.
To get the lens of the monocle, I filled the opening in the monocle with Crackle Accents on my non-stick craft mat and then waited and waited and waited for it to dry. It took over 7 hours! It was difficult to pull up without breaking it, so I would recommend a layer of acetate underneath that you can trim to size (or cut with your cutting machine beforehand) to support the Crackle Accents. I really love how it turned out (I also sprinkled a few drops of Gold Glimmer Mist onto the lens along with a tiny amount of Doodlebug Sugar Coating black glitter while it was still wet.) I laminated the monocle with my Xyron 900 to give it some strength. I used bamboo skewers for all the photo props.
Here are the teens, hamming it up:
Here’s my son, emulating his favorite British gentleman:
and then just getting silly!
And there you have it! Six props and three hams! These pictures are so much fun! I can wait to scrap them! I could also retire some of the props to the page for fun!
Thanks so much for stopping by today! I sure hope you’ll play along with the Halloween – not a Card Challenge over at the Creative Cutting Challenge! Have a top-notch day!
Thanks for leaving a kind word or two! It really puts a smile on my face!
Ruth
P.S. While these are simple, no layer files, if you need information about how to use SVG files in Silhouette Designer Edition software, please see this post, where I do a tutorial of the process.


Comments on: "How to turn a child into a ham" (3)
Cute, cute, and super cute!!!! I love the idea of using these props on the scrapbook pages!!!! 🙂
Looks like the kids were having a great time with the props you made and you sure got some awesome pictures.
So glad you explained how you made the monocle as I could see it had some type of lens to it….AWESOME!! And the photo shots you got are priceless—super cute and fun.